
Enamel Experiment

I was browsing the forum on Barbara Lewis's Painting With Fire ning group the other night and saw a photo a member had posted showing how to fire an opalescent enamel correctly. He'd used what looked like a chasing on air fold formed copper disc and looking at it set something off in my brain!

I liked the idea of having a definite break in the surface of the disc which would make enamelling it in two different colours slightly easier than trying to achieve a gap or straight line by my, at times, rather shaky hand :D

So I got the disc cutter out and my torch and mallet and started playing. Made the fold, miraculously pretty well centred I have to say, into the pickle, a quick clean up then started playing with the enamel powders. I really wish I'd taken some photos along the way.......

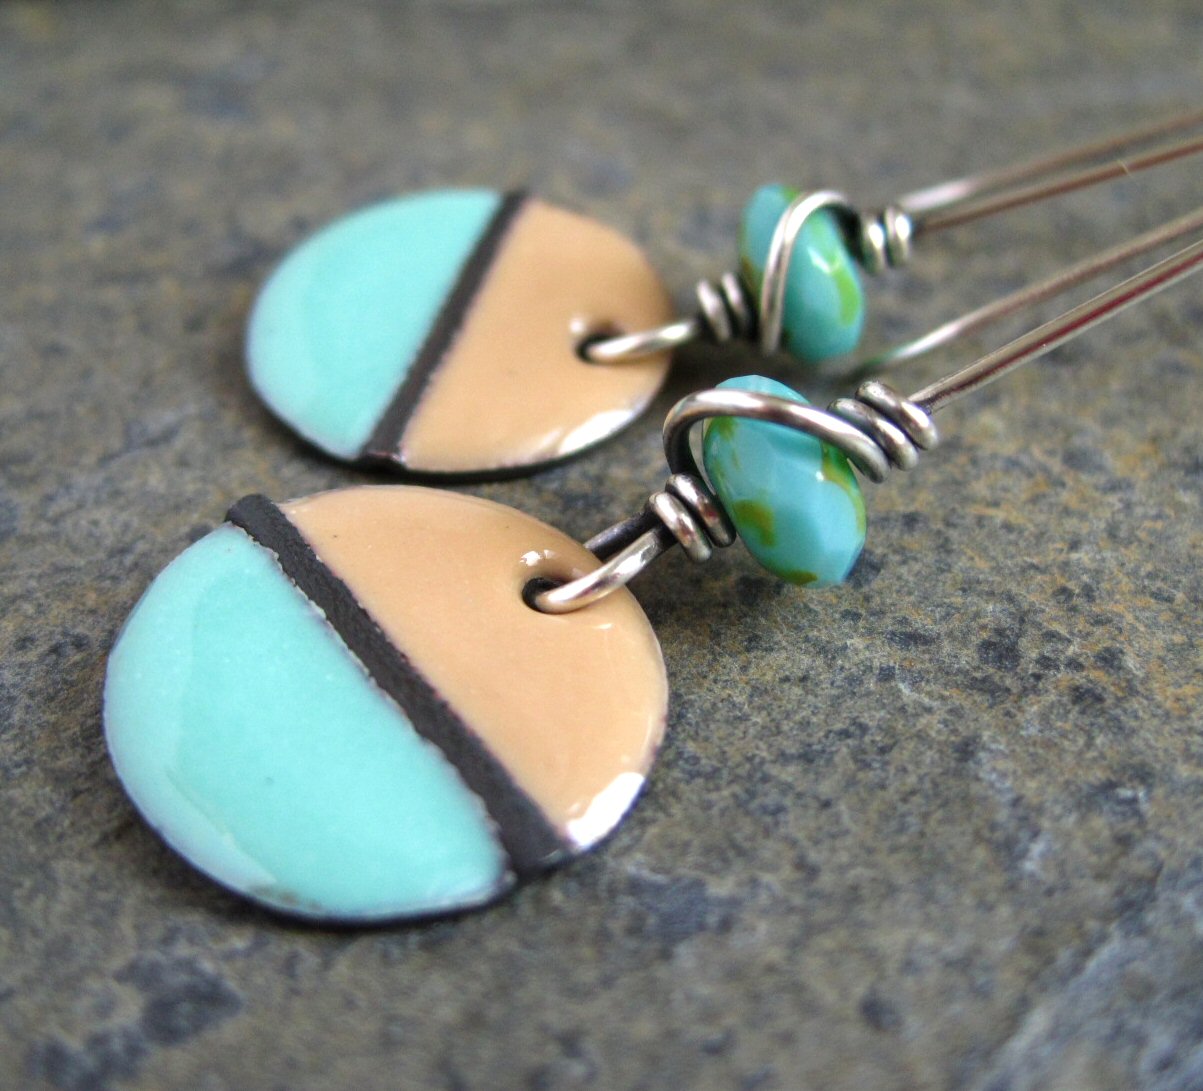
After counter enamelling I used a small piece of card (a Moo minicard actually!) to cover one side of the front of the disc then sifted the nut brown onto the other side, carefully cleaning up any stray bits of enamel with a small paintbrush then fired it. I did try to sift both colours at the same time to start with but soon realised that wasn't a good idea - some of the seafoam got mixed with the nut brown and I had to abort and start again.

A quick clean up inbetween (enamelling isn't quick) then I sifted the seafoam and fired again. Repeated the whole process with another coat and this was the result...


I decided to pickle the discs again to remove the firescale then oxidised them to black and added some long sterling earwires with a matching czech glass bead.
It got me thinking about other designs.........like how having the fold running top to bottom slightly off centre to allow for the hanging hole would look pretty cool or just enamelling one side and leaving the other plain, textured or stamped which I would oxidise later.

I've certainly got lots of ideas buzzing round my head now. I'll try and remember to take some photos next time too :D


Comments

  1. These are beautiful! I can see so much potential with the fold forming and enameling. You brought it home! I hope you post them on the ning. :-)

    ReplyDelete
  2. Thanks Barbara! I will post them on the ning too :D

    ReplyDelete
  3. Really nice! They actually look tasty :-)

    ReplyDelete
  4. Love your enamel work, and thanks for the ning link - I'm a month away from setting up my workshop so that I can have a play with the enamels and glass, and everything else!

    ReplyDelete
  5. I love your work! These discs look beautiful!

    Ambra

    ReplyDelete

Post a Comment

Your comments and questions are very welcome!
If you would prefer to contact me directly please use the contact form on my "get in touch" page.
Any comments containing links will be deleted so please don't waste your time.....

Popular posts from this blog

Combining Soldering And Enamel

The need to make cute, brightly coloured enamel studs propelled me into the world of combining soldering with enamel a couple of years ago. I knew from reading up on it that it was possible to enamel and solder on the same piece but wasn't too confident I was able to do it back then. It was a slightly embarrassing occurance that made me just get on with - I'd made some enamel studs with glued on stud posts. I'd used 2 part epoxy resin which was a job in itself as it set hard after 5 minutes so I had to keep mixing more up. The finished studs looked ok but that little voice in my head kept asking "are you sure you want to use glue?" I wasn't but didn't think I had any other way to do it so I used glue. I sold my first pair and merrily sent them on their way to Canada. A couple of week later the buyer got in touch to say the stud post had come off one of the earrings and the other was hanging off. I was mortified, apologized profusely and refunded her m...

Amazing Enamel Effects

Buying a kiln recently has given me the chance to experiment with enamelling on larger pieces of copper and to produce some really cool effects. These effects happen when you combine different types of enamel. I usually use smaller flat pieces of copper for making enamelled earrings and have had some of these effects happen when firing with a torch but they are much more obvious when you use larger pieces. I made a few practice pieces which you can see in the photos below. This was flux {a transparent enamel not to be confused with soldering flux!} applied straight onto copper and fired until the copper was a bright golden colour. Then I added a layer of liquid enamel in green and red over the flux and fired again.  The lines and spots form when the enamel becomes hot enough to start moving and in this case the transparent pushes through the liquid enamel layer forming these cool lines and spots. The effect is better in the green liquid enamel than the red.  N...

Embossing Metal With My Sizzix Bigshot

I must admit up until a few weeks ago I was vaguely familiar with the name Sizzix but as to what you actually did with a "Sizzix" I was completely in the dark! That was until I stumbled across a video from Vintaj showing how you could use their embossing folders with a Bigshot to create designs on metal ("metal" - my favourite word after chocolate!) I was really impressed and itching to have a go, I just needed a Bigshot........ I waited a few weeks then when the urge to possess one overcame me I went out debit card at the ready..............and the shop had sold out! So I trundled off to The Range on the off chance and came home clutching my own surprisingly heavy pink and black wonder machine. It sat on the dining room table for a couple of days while I waited for the embossing folders I'd ordered online to arrive then the time came to start playing! I started with some pre-cut 24g copper hearts and the Wildflower Vines and the Butterfly Swirls Deco ...