I've admired enamelled jewellery for a while now and not too long ago did a blog post about Etsy seller tekaandzoe and her wonderful kiln enamelled creations. I didn't think at the time that it was something I would ever be able to do as the cost of kilns plus lack of space would be a problem for me.
That wasn't until I saw an advert for a torch enamelling tutorial from US jewellery supplies website Beaducation by Steven James. It's a great tutorial showing the basics on how to torch enamel on copper. Of course I bought it! I then spent hours scouring the internet for more information on torch enamelling, where to buy the tools I'd need and of course the enamel powders. There are quite a few UK sites selling enamelling supplies and tools but as usual I found the US sites had more choice (why do we always lag behind?) I bought some enamel powders from a couple of UK sites to begin with - Cookson Gold have a good selection but bear in mind the leaded enamels have to be sent by courier which costs £11!
So armed with my prepared copper discs, a not very suitable trivet (I've since bought two much better one's from Thompson Enamel), a small kitchen sifter as the proper enamel sifters I'd ordered hadn't arrive yet (patience is a virtue I know!) and a few opaque enamel colours I nervously "had a go".
My first attempts were amazingly fine which surprised me, just one colour on flat copper discs, although I was slightly alarmed when the red enamel powder turned black on contact with heat (that's normal!) and that was it I was hooked! As I read somewhere recently - enamelling isn't difficult to do it's doing it well that's the hard part.
What I've learned so far :
• You must wear a particulate mask when using powder enamels - some enamels contain lead, arsenic, cadmium and boron - not the sort of stuff you want to be inhaling
• You can use a butane torch for enamelling - it works fine for small pieces
• Yes you do need to counter enamel (enamel the back) your pieces. Copper and enamel expand and contract at different rates when heated and cooling down and counter enamelling the copper helps stabilise the tension between the two reducing the chance of warping and cracking
• Transparent enamels do need to be washed if you want to use them over other colours otherwise they can appear cloudy. You can get away without washing them if you're using them directly onto copper though
• A fired piece that appears fine at first can fiendishly change after a couple of minutes, hours, days or weeks! Cracks, pits, tiny hairs that you didn't see at the time of firing and black spots can appear which can be very frustrating
• If you see a black spot in the enamel as you're sifting don't hope it will "blend in" and not show when the piece is fired, it will!
• Enamel pens (available from Thompson Enamel) are not very easy to use
• Two thin layers are better than one thick one
I'll stop for now but I could go on for much longer! Below are some of my fledgling enamel jewellery designs, I'm still finding my way and having fun experimenting. I'm pleased that some of my enamel pieces have sold which always helps when you're trying something new and wonder if anyone will actually like it! I'd love to hear from anyone with enamelling tips or anyone who's thinking of having a go themselves :D

Ivory and Coral Flowers

Purple and Lavender Discs

Opaque over Transparent

Seafoam Green and Chestnut Brown Flowers

Seafoam and Nut Brown

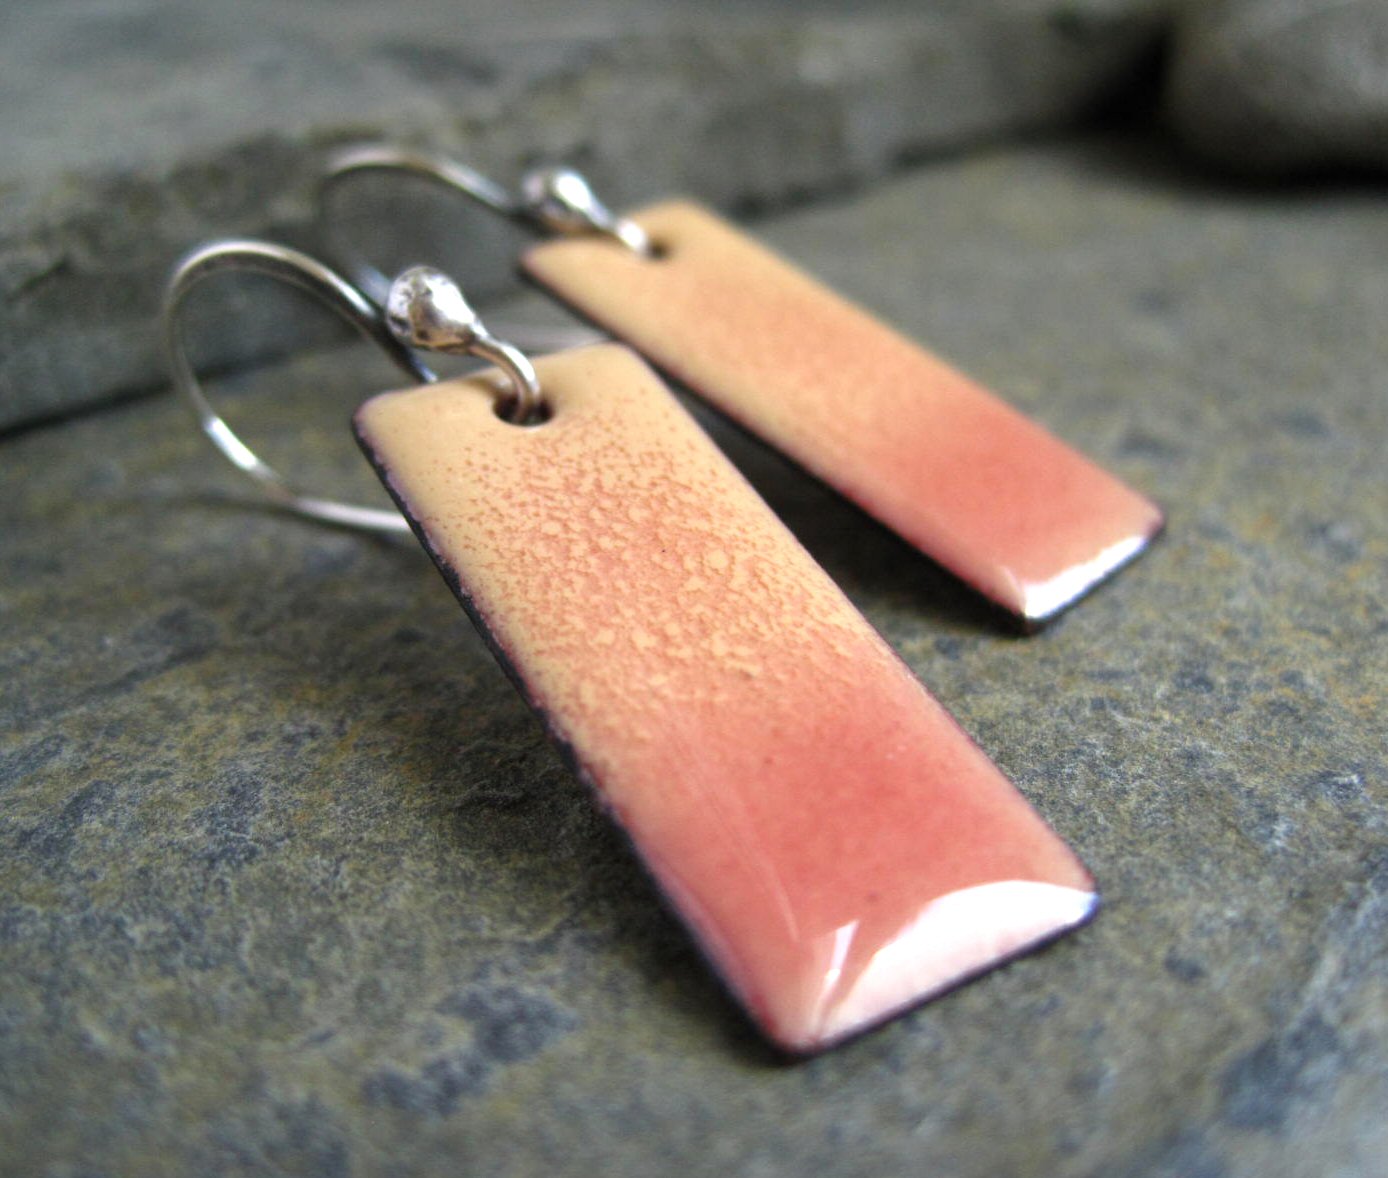
Terracotta and Sterling Disc
Fabulous earrings! Each one is a beauty! Your research may have landed you on one of Barbara Lewis' websites (paintingwithfireartwear.com) which sells beads for enameling with torch and other supplies. Then an enameling website where artists share (paintingwithfire.nig.com) their work and help with any problems they might be having, is a great source. I have been giving enameling a try and have blogged about it myself, however, when trying to enamel copper discs it didn't go well for me. Do I assume correctly that you are laying the discs on a trivet and sift the enamel over it, before filing? How do you prepare the disc? I was dangling the object in the flame with little luck! Thank you for posting about this and again these earrings are going to sell like MAD! Enjoy your day, Millie
ReplyDeleteHello, you did a wonderful job, would never know you were a newbie, is it expensive for the supplies? ttfn :)
ReplyDeleteThese are wonderful. I have been thinking of trying torch enamel but thought I should wait until I could find a class some where. After reading your post I think I just may check out that Beaducation class and have go. Thanks for sharing.
ReplyDeleteThese are great! Some lovely bold new earring designs.
ReplyDeleteThank you for your lovely comments!
ReplyDeleteMillie - Yes I discovered Barbara Lewis's site and ning group! I'm not sure how easy her method of enamelling flat pieces is though, it's much easier to sift the enamel onto the piece laid flat then fire rather than dip it when it's hot. I prepare the copper by punching a hole/doming it etc then a quick sand then wash it with a toothbrush and washing up liquid to remove any grease otherwise the enamel will not "stick" properly when fired.
It's better to sift the enamel powder first before putting the copper onto a trivet. This stops your trivet getting covered in enamel.
somethingunique - supplies aren't that expensive but initially when you're buying everything you need it can be. Enamel powders are about £4 - £7 for 50g but you don't use that much so they do last and some sites sell them in smaller quantities. The essential tools are a torch, firing block, mask, trivet, tweezers, sifters, and powders. A lot of the other stuff I use I already had.
Love your post and thank you for sharing! I too have been an admirer of enameling but also assumed I would have to purchase a kiln and lots of equipment. Your pieces have turned out beautiful, I would never have guessed your just starting out. You have inspired me : )
ReplyDeleteThank you Tania!
ReplyDeleteThis is a really interesting and informative post and I'm thinking I would like to try. You are so enthusiastic about it and I love the earrings you have made, the flower ones especially are really lovely.
ReplyDeleteDeb x
Those are gorgeous!
ReplyDeleteAnd I agree -- things happen days and weeks from firing. I have a few beads that just flaked right apart and I was so glad it was on my OWN necklace and not on someone else's! I think the key for me now is thinner but more frequent coats.
Thank you Deb and Lori!
ReplyDeleteWow! Fab work and very inspiring. Loving your flowers. Its going on the techniques-to-have-a-go-at list, which is unfortunately miles long.
ReplyDeleteGreat to know I dont need a kiln though.
Thanks for sharing your experiences
Gemxxx
I saw your pics on Flickr and had no idea you were new to this - your work looks amazing. Great post - you've definitely piqued my interest and i'm off to read my kiln manual too!
ReplyDeleteThanks Gemma and Lesley!
ReplyDeleteThese are absolutely beautiful!
ReplyDeleteI was told that I could get away without counter enamelling but I think you are right and that it needs to be done (after my first, not so great attempt!) Thanks so much for listing your tips. You've inspired me to persevere and hope that I will get some results that look as good as yours!
-Sarah :-)
Thanks Sarah :D I have tried to get away without counter enamelling small pieces but they usually end up developing cracks sometimes weeks after you've fired them so it's not worth it just to save time.
ReplyDeletei'm just about to start experimenting with enamelling (eek!) and found this blog really helpful. Thank you :) so here's to a hide-a-way winter in the welsh hills! I'll be sure to post any successes and mention your name! blessings x
ReplyDeleteWhere have I been??? Your jewellery is gorgeous!
ReplyDeleteI'm teaching myself silversmithing and my dad's keeps going on at me to try enamelling but I keep saying no because you need a kiln etc... Then I caught sight of 'torch enamelling', googled it and came across your wonderful site!
You've given me hope. I just hope I can make such pretty pieces! Can you only use it on copper or can you use it on brass/silver?
Thank you for blogging this, I'm just sorry it's taken me so long to find you!
I am trying to learn how to do what you do!!!! Copper is where I have started. I live in Boise, ID in the US. I would like to purchase a good torch. I looked at the Cookson Max Flame Butane Hand Torch #999 955B. I guess I have to buy it from England?? I do not know how much it is in American dollars...duh. Can you help me with suggestions and money part? Thanks, I love your stuff! I am young at heart (61) Mary
ReplyDeleteThank you for your comments!
ReplyDeleteMary Ann - I'll answer your question on your blog :D
Love your site, thanks you for doing this. I am a novice jewelry designer and maker. My only problem has been sourcing things to buy, wholesale enamel for copper is the biggest one, along with silver chains and findings I literally can't find information on SAFE wholesale sites from china, etc. do you have any suggestions or links to others suggestions to help with this problem.. all the best and thanks!
ReplyDeleteThanks for your comment :D
ReplyDeleteI buy my enamel from a Thompson's enamel supplier in Denmark. The 50g bags last a long time!
I make my own findings and buy chain from Cookson Gold and Palmermetals in the UK. Not sure I'd risk buying sterling findings from China - no disrespect but you can never be certain what you're getting sometimes especially with silver.
Loved your post and your jewellery is gorgeous. I discovered flame enameling 2 days ago and have been surfing like mad to find out more. As a hobbiest jeweller I have a lot of kit already but like you neither the space or the money for a kiln. From what I've gleaned Thompson enamels are considered the best for this technique, I have been unable to track down a supplier in the UK. You mentioned a firm in Denmark could you let me have the name or contact details? I'm really keen to discover how to enamel this way, your work is a great inspiration.
ReplyDeleteHi Chocolatefdawn, thanks for your comment.
ReplyDeleteThe Danish Thompson enamel supplier is www.enamelsupply.com
He's very helpful if you have any questions.
Love every single piece you've posted here! If these were your first, you must be totally brilliant by now!!
ReplyDeleteLove all the work you posted photos of!!
ReplyDeleteThanks Seadragon!
ReplyDeleteLovely work! Thank you for the advice.
ReplyDeleteAwesome Awesome...I cant believe that these were your experiments...they look so professionally made. I am just starting with metalsmithing and coloring and hope that someday I can make something this good
ReplyDeleteAlso you said that firing and dipping didnt work for you, so what was the process that worked. How to enamel on both sides if we fire on a firing brick
ReplyDeleteThanks for your comments!
ReplyDeleteDivya N you need to fire on a trivet whether you use a torch or fire in a kiln if you are going to enamel both sides unless you do the Barbara Lewis dipping method.
It's a much quicker way to do it but not controlled enough for me plus my enamel got contaminated with bits of firescale when I tried it.
I prefer to sift the enamel powder onto the copper then fire on a trivet one side at a time.
I so want to get into enamelling. Your pieces are so beautiful! I can't find a trivet and tripod here in the UK anywhere. I looked on Thompson enamel but they don't seem to have any either. Hopefully I will track them down eventually as I'm inspired by your wonderful results. Thanks so much for sharing.
ReplyDeleteHi Tracy,
DeleteThanks for your comment!
You can get the trivets from Thompson Enamel - https://thompsonenamel.com/index.php?cPath=238&sort=2a&page=3&osCsid=oma8qo0v1chobjvi089n5a99p7
I got my tripod from ebay. I don't use the tripod that often as smaller items tend to get burnt at the edges as I need to use a bigger torch with the tripod. I prefer to perch the trivet precariously on the edge of my soldering block and fire smaller things that way!
ReplyDeleteI've just recently got up the courage to try enameling with a torch and appreciate your great instructions, but I don't understand the part about 'washing the transparent enamel'. Would you please elaborate for me?
Thanks for your time, and love your work!
Marilyn
Thanks for your comment Marilyn. I've replied to your question by email :D
DeleteTracy,
ReplyDeleteLovely designs! You've done an amazing job with this technique. By the way, I have a new torch enameling book coming out in June! Discover Torch Enameling, by Kalmbach Books (tinyurl.com/discoverenameling). I can't wait to see how it inspires designers just like you and your readers.
Cheers,
Steven James
Thank you Steven! It was your first torch enamelling video that inspired me :D
DeleteFor a first timer at enameling...you did a MARVELOUS job! I'm now trying to "counter enamel" a piece and was literally in tears when I found that my brand new, very tiny kiln was..well, too tine!
ReplyDeleteThis lead me to your site. I'm looking everywhere to see if I can torch fire the counter enamel??? I'm going to give it a shot since I've already got it ready. Talk about bummed out!
Let me know if you find anything on this please. I'll do the same.
Thanks much!
Teri
Urban Muse, LLC
UrbanMuse2@gmail.com