
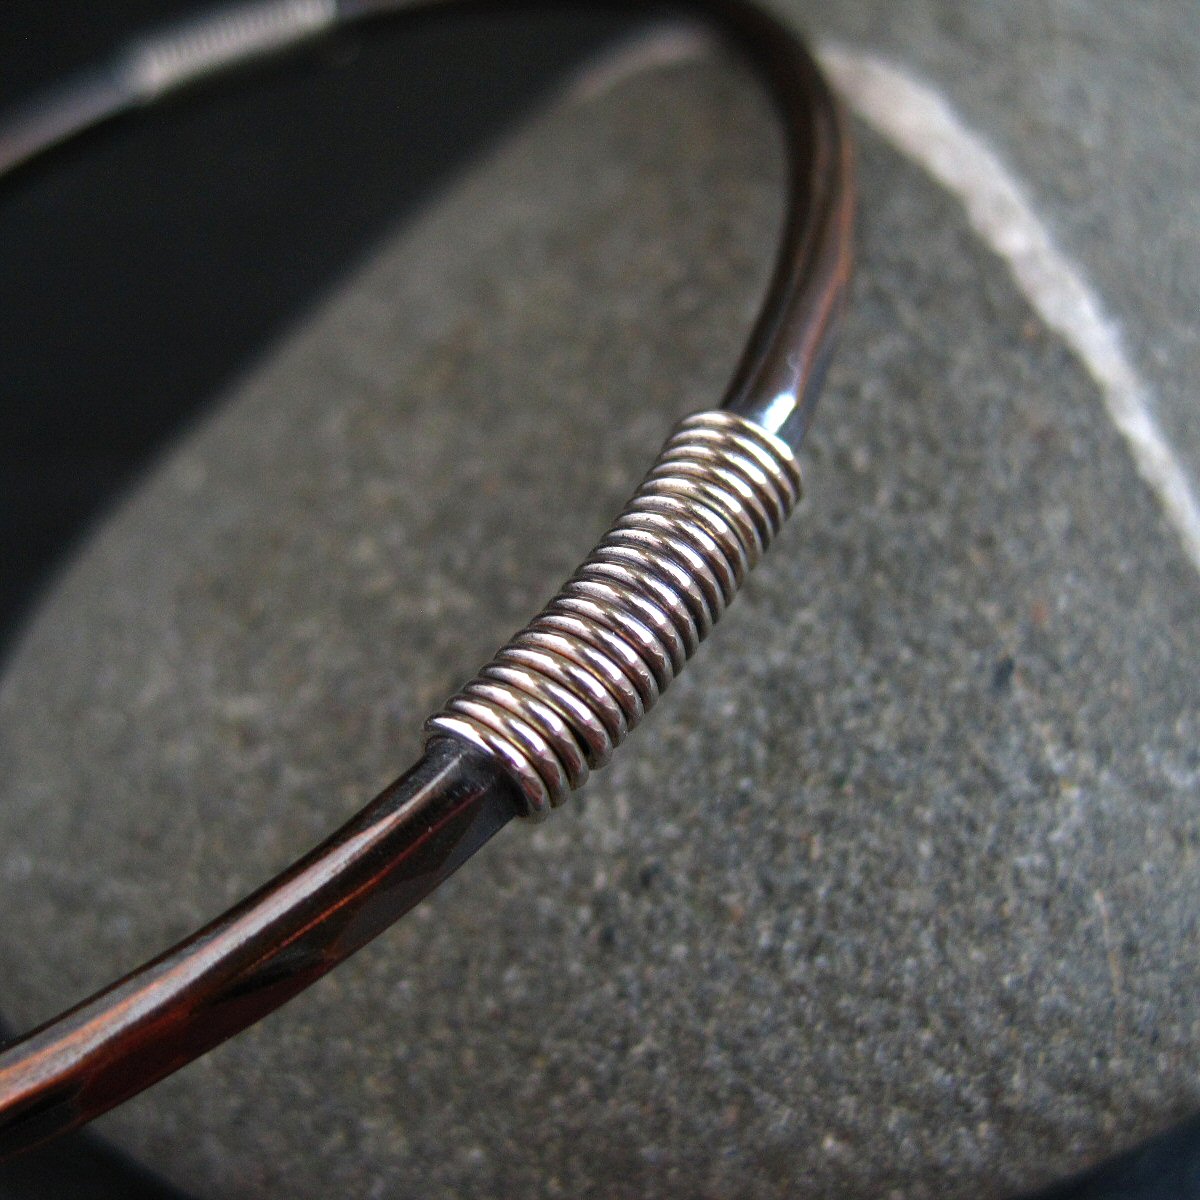
My continuing love for making bangles now includes bangles with added coils. It's one of the things I attempted with the very first bangle I made a few months ago....

I tried to solder the coils using paste solder on this one as I thought it would be easier but it just didn't work - the paste solder just burnt and formed a lump and refused to flow so I went back to using strip solder. That worked better but positioning the tiny pallions was a bit tricky "back then" and I ended up with a bangle a little bit out of round.
Since then I've learned to pick solder which makes life so much easier! Pick soldering is basically melting the solder into a ball which will then stick to your soldering pick meaning you can position it in tricky spots more easily. Once your metal is up to the correct temperature you place the ball of solder on the join and it flows immediately (in theory!) It doesn't always flow immediately but it will stay in place and is a much quicker way to solder than positioning small pieces of strip solder on an awkward join then watching them slide off as the flux bubbles. I use this method to solder all my bangle joins and to solder on the coils on my new bangles.

The oxidized sterling silver version three of which I am (yes I really am) going to make for myself "soon" and a copper and silver version...

Excitement Alert!!
I'm very pleased to announce I am now the proud owner of a rolling mill. Yes! I have one at last and it's a Durston! Ever since I discovered rolling mills and what you could do with them I have coveted one but a look at the prices soon changed my mind and I made do with other ways of texturing my metal. I have been using the rolling mill at the night class I go to but the rollers aren't properly aligned so you only get half a texture most of the time. I did ask the teacher if it could be sorted but apparently they can't fix it so that kind of pushed me into thinking about getting my own rolling mill.
It was then a case of arguing with myself over whether to get one of the cheaper versions or to splurge and go for a Durston. I didn't want to get a cheaper one and regret it but the Durstons are so expensive and I didn't know where I was going to put it when I was using it or where it would go when I wasn't. Not having a workroom or bench causes problems like this! I don't have anywhere to fix it permanently but decided to worry about that when it arrived. So I went for a Durston in the end as a reward for not smoking for over a year now. I'm slightly embarrassed to admit I smoked in the first place to be honest as it's such a stupid thing to do but I've stopped and I feel so much better for it plus I've saved myself over £2,500 that would have gone on fags in the last year or so. So spending nearly £400 on a rolling mill was sweetened a little by that thought at least.
Here it is - I solved the fixing it in position problem by using two G-clamps and attaching it to the worktop in the kitchen. That really is the only place I can use it but it's very sturdily fixed and quite safe to use. I need to open the cupboard door to attach the clamps but I didn't think you would want to see the contents of my cupboard :D

It works wonderfully evenly and I've tried out a couple of leaf skeletons on copper and silver which came out really well. I know it's going to get a lot of use and I am thinking of selling textured copper discs in the future too.
As for somewhere to keep it when I'm not using it or gazing at it lovingly... I have acquired part of another cupboard in the sideboard. Me and my jewellery making equipment are slowly taking over.........
Can't wait to see what you do with the rolling mill. I'm seriously envious and thinking of adopting your reasoning... I haven't ever smoked, so I think I really deserve on of those, too!
ReplyDeleteCongratulations! I'm sure you will put it to excellent use :-)
ReplyDeleteYay new BIG tool!! Have you had a play yet? I've got an elcheapo one myself. And thank goodness as I don't even use it, so I can imagine how sad I would be if I had of spent on a better one like Durston lol.
ReplyDeleteThank you! I love my rolling mill and will make sure I get a lot of use out of it!
ReplyDeleteCongratulations on the new member of your family! And congratulations for giving up smoking... you certainly deserved a reward. I hope you will both be very happy together!
ReplyDeleteKristin :)
Thanks Kristin, I'm sure we will!
ReplyDeleteYour leaf imprints look brilliant! Tried getting leaf patterns myself, but guess I should have used skeletal leaves and maybe less pressure - just got squashed leaves...
ReplyDeleteMatthew
https://www.facebook.com/MatthewGaleArt
Thanks for your comment Matthew.
ReplyDeleteYes the leaves do need to be dried to work.
I haven't tried skeleton leaves yet. But I promise, it's possible to smash a hard needleworked lace too! It turned into paper... Absolutely FLAT! 😂
ReplyDeleteI can believe that! Although paper will still leave a texture on metal in the rolling mill too :D
Delete