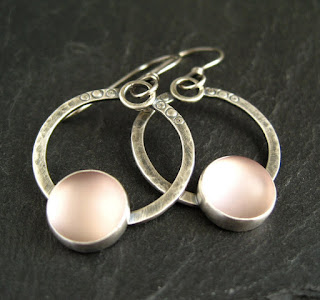
Sterling Silver Hoops with Glass Cabochons


I went through a hoop phase a couple of weeks ago when I just had to make some hoop inspired jewellery. I quite often get these urges - sometimes it's for enamel, sometimes it's etching, it just depends. I'm currently in the grip of a hollow form phase but I'm having to wait for supplies before I can go any further which is a bit annoying but does serve to make me think about it a bit more before diving in!


I wanted to continue my bezel setting practice so I added cabochons to the hoop earrings and pendants. I stamped a circle design onto the hoops and added a jump ring at the top then pierced out the part of the hoop in the centre of the jump ring to make a cute hanging hole.


The glass cabochons are from a Turkish shop on Etsy and are lovely!  They remind me of jelly sweets.
Tip! Put a piece of aluminium foil behind the glass cabs before setting them. The foil gives them a luminous glow in the light and avoids the backs of the bezels darkening and dulling the colour due to the silver oxidizing over time. Cutting the foil discs neatly to avoid too many creases is easier said than done! Luckily these were the same size as one of the holes on my disc cutter so I used that to cut them. One thing I soon realized was that the silver on the bottom of the bezel needs to be completely smooth otherwise any bumps (from solder, etc) will transfer through the foil and show on the bottom of the glass cabs as dark patches. I had to abort two pairs because of this before I figured out what was going on. I think the solution is to add a disc of sanded copper under the foil so then you know it will definitely be completely flat and smooth.


 I love the delicate ghostly colour of the pink glass.


A simple pair using the greeny-turquoise colour glass. This is the first time I soldered jump ring links onto the tops of bezels to thread the earwires through and thankfully I managed ok and it worked. It can be fiddly and I'm not that great yet with the combination of soldering and fiddly. Still learning!

Comments

  1. You say your still learning but I think you have it down pat, beautiful work!

    ReplyDelete
  2. The look lovely! Frosted glass gets such a beautiful glow when backed with foil -- it's a small detail that makes a big difference, really.

    (Myself, I've added variegated leaf metal to tumbled cabs and rivolis, getting both glow and colour/pattern.)

    ReplyDelete
  3. Thanks for your comments!
    I am finding setting cabs a bit easier the more I do.... :D

    I also thought about putting different colour paper (maybe?) or foil behind the frosted glass cabs to see what the effect would be but haven't tried it yet.

    ReplyDelete
  4. Wow such a beautiful earring.With this earring we wore matching dress.
    Thanks for sharing this.

    Jewellery Gippsland

    ReplyDelete

Post a Comment

Your comments and questions are very welcome!
If you would prefer to contact me directly please use the contact form on my "get in touch" page.

Popular posts from this blog

Combining Soldering And Enamel

The need to make cute, brightly coloured enamel studs propelled me into the world of combining soldering with enamel a couple of years ago. I knew from reading up on it that it was possible to enamel and solder on the same piece but wasn't too confident I was able to do it back then. It was a slightly embarrassing occurance that made me just get on with - I'd made some enamel studs with glued on stud posts. I'd used 2 part epoxy resin which was a job in itself as it set hard after 5 minutes so I had to keep mixing more up. The finished studs looked ok but that little voice in my head kept asking "are you sure you want to use glue?" I wasn't but didn't think I had any other way to do it so I used glue. I sold my first pair and merrily sent them on their way to Canada. A couple of week later the buyer got in touch to say the stud post had come off one of the earrings and the other was hanging off. I was mortified, apologized profusely and refunded her m...

Torch Enamelling - What I've been Up To Recently!

I've admired enamelled jewellery for a while now and not too long ago did a blog post about Etsy seller tekaandzoe  and her wonderful kiln enamelled creations. I didn't think at the time that it was something I would ever be able to do as the cost of kilns plus lack of space would be a problem for me. That wasn't until I saw an advert for a torch enamelling tutorial from US jewellery supplies website Beaducation  by Steven James . It's a great tutorial showing the basics on how to torch enamel on copper. Of course I bought it! I then spent hours scouring the internet for more information on torch enamelling, where to buy the tools I'd need and of course the enamel powders. There are quite a few UK sites selling enamelling supplies and tools but as usual I found the US sites had more choice (why do we always lag behind?) I bought some enamel powders from a couple of UK sites to begin with - Cookson Gold have a good selection but bear in mind th...

Etching Silver Using Nail Art Stamps

So my love/hate relationship with etching sterling silver continues. I've tried a few times now and always end up with different results most of them not that great to be honest. I've tried connecting the silver and a piece of copper to a 9v battery and also heating the ferric nitrate. Sometimes the results are good sometimes not so good. I currently have an etched piece of silver sheet waiting to be reticulated and rid it of the mess that is the etched "pattern".  I now know that using stamps and Stayz On ink just doesn't work with silver - the time needed to etch using ferric nitrate is much longer than etching copper and the ink starts to wear away after about an hour. This results in the pattern being patchy as the resist is eaten away and the silver ends up quite lumpy and course looking. I have yet to try using pnp paper. I don't know why but it all seems a bit of a faff to do. I don't have a laser printer so would need to find somewhere or...