
Around the World Blog Hop
The idea behind the blog hop is for creative bloggers to write a post based around a couple of set questions. Their answers offer an insight into their creative thoughts and processes. The blog 'baton' is then passed on to a fellow artisan and so the trip around the globe gathers pace.
I was very kindly asked by Heather of Little Ram Studio on Etsy to continue the hop. Heather and her husband Gary create delightful lino cut prints of British wildlife, dogs and beautiful landscapes. You can read Heather and Gary's Hop post on their lovely blog Studio Tales.
What am I working on?
I've recently become very interested in using resin in jewellery after watching several videos by Jennie Milner , a US jewellery maker. Her work combines metalwork, art and resin and the result is colourful and fun jewellery.
I'm very drawn to colour in jewellery so once I found out you can colour epoxy resin whatever colour you like {yippee!} I was hooked and quickly ordered my Ice Resin starter kit.
I've literally just been playing around with it this week and have made a few practice pieces in order to discover what can go wrong and how to fix it....

The main problem I encountered is bubbles! The pot of mixed resin {top right} is full of millions of tiny bubbles. This is a problem a lot of people have and is solved by making sure the resin is warm. My resin and hardener were stored in my shed which during October in the UK cannot ever be described as warm! Adding the acrylic paint did help to get rid of a lot of the bubbles and the advice to breathe on the resin or use a flame to gently pop the bubbles also helped.
I decided to have another go the following day, this time I warmed the resin and hardener in a jug of hot water before I started, then again after mixing. This definitely helped a lot and although there were still some bubbles in the resin it was a lot less than the first time. This time I added the resin to some backless copper shapes I'd originally made to set some stones on but I thought they would be perfect for resin instead.

The results of my initial resin experimenting are bottom right. There are some issues such as streaks in the colour and tiny pits where new bubbles have risen to the surface and popped during curing. They still need another day to cure {set} properly before I can do anything else to them such as sanding or drilling.
I still have a lot to discover and learn about using resin so this is an experiment that will be continued until I get it right. It could take a while......
How does my work differ from others in its genre?
In the past my jewellery has been described as dramatic and bold which isn't how I see it at all! I see it as a mixture of rustic, fairly simple designs with bursts of colour. I have been influenced a lot by the jewellery trends in the US and absolutely love working with copper. I think one of the things that maybe identifies my jewellery is pattern and texture on metal. I will always add texture to a metalwork piece using the rolling mill or by etching as I think it adds interest and works well when the metal is oxidized with liver of sulphur to give it an antique patina finish.

Sterling silver pendant with enamel cabochon
I also enjoy using enamel which I fire with a torch. It's a fairly inexpensive way to add a real splash of colour and I've recently started using enamel decals to add a further touch of interest to earrings and pendants.
The most important thing is that I haven't got to a point yet where I'm content to stop learning and focus on one particular technique - I love discovering new techniques and buying new tools {the latest is a mitre jig} which is why my jewellery style is pretty varied. I don't do "collections" as making the same items over and over would drive me nuts!

Torch enamel earrings with enamel decal
Why do I create what I do?
I was never particularly artistic when I was younger but I've found as I get older making things is a really good way to relax and forget the world for a while. It's like a bit of free therapy in a way.
My thing about earrings is what made me start making jewellery - I saw some handmade jewellery online while I was shopping for earrings one day and it struck me that I could probably do that too. How fabulous would it be to make your own earrings? Very fabulous indeed and I haven't stopped since.
I think I'm forever hoping to make that elusive "perfect" piece of jewellery and until I do I will continue to make new pieces and learn new techniques. I doubt I'll ever get there to be honest but the thought of it is what keeps me going!
I think I'm forever hoping to make that elusive "perfect" piece of jewellery and until I do I will continue to make new pieces and learn new techniques. I doubt I'll ever get there to be honest but the thought of it is what keeps me going!
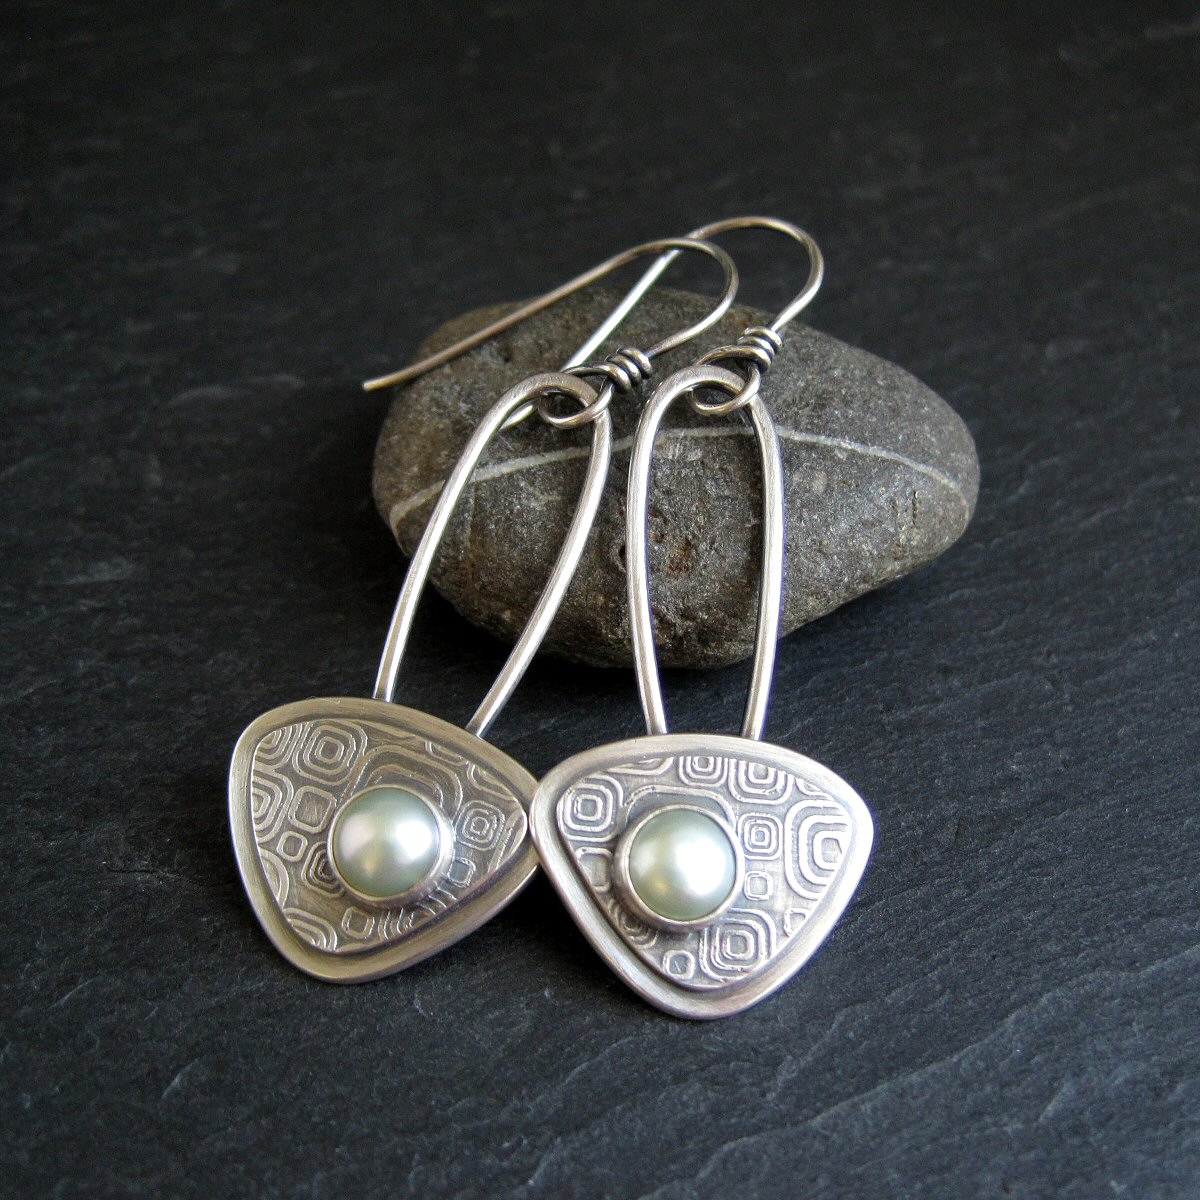
Etched sterling silver earrings with freshwater pearl
How does my creating process work?
It varies. Sometimes I will have a very definite idea of what I'm going to make and at other times a design will just evolve and morph as I go.
I recently started making a new copper bangle design featuring a silver poppy with silver wire wrapped around part of the copper bangle and soldered in place.
I recently started making a new copper bangle design featuring a silver poppy with silver wire wrapped around part of the copper bangle and soldered in place.

Copper bangle with sterling silver poppy
This came out virtually how I imagined it apart from a slight change to how the silver poppy is attached. The mechanics of a piece need to be considered too and I'm always concious of how wearable a piece will be. You can't have anything falling off or causing any kind of damage to skin or clothes.
I do sketch ideas in a pad and on bits of paper that are then stuck to my shed wall for when I need a bit of inspiration. I tend to be influenced by shapes a lot and I'm very fond of organic pebble-like shapes, swirls and dots.
Sometimes the finished piece will look completely different to the original idea I had but that's fine, it's a good way to discover what works and what doesn't and makes the process more streamlined next time you make it. Some of my, let's call them experiments, are the one's that sell the fastest!
I hope you've enjoyed reading this and will check out the next post on the Blog Hop which will be written by Kristen of K S Jewellery Designs. Kristen makes beautiful sterling silver wirework and metalwork jewellery and if you love flowers you'll love her jewellery!

Great interview Tracy. It is amazing how crafting is such a relaxing outlet for so many of us! You are super creative and always creating new cool pieces. I love what you did with the resin in the wire. Very unique!
ReplyDeleteThanks Val!
DeleteI am a big fan of your work Tracy and I think that you have the optimum amount of Classy and Whimsy in your work. I really like these resin filled organic shapes - very interesting. I am not resin expert but I have worked with it for a few years and could give you some tips. There is also a full post on my blog filled with resin tips, I'll mail you the link.
ReplyDeleteThanks Divya,
DeleteI'l have a look at your resin blog post :D
Yay Resin! Nice colors...I play with it too but not often. What do you use as a back to prevent the resin from running everywhere? I use saran wrap but it's not working very well and neither did contact paper. :(
ReplyDeleteThanks Kalaya! I used brown packing tape which worked ok but clear is better so you can check for bubbles underneath. I just rubbed the tape against the copper really firmly so it was sealed well. You could use rubber cement around the outside edge as well.
DeleteThanks Tracy for the tips. I may give it a go. Sounds too much like work though! hahaha!!!
DeleteI just discovered your tutorials this morning and love how you illustrate and make it simple. If you have not discovered how to rid the resin of bubbles yet, a quick pass over with your torch every few minutes will cause them to rise to the surface and go away. Just keep an eye on the resin for about 20-30 minutes, and it only takes a few passes, but it will be as clear as glass!
ReplyDeleteThanks for the tip Mardi!
Delete